As a world-class shopping cart, nopCommerce has a very flexible MVC-based theming system. nopCommerce themes are made up of a collection of Cascading Style Sheets (CSS), JavaScripts (JS), images and other resources. Creating a basic theme in nopCommerce is nothing more than supplying your own CSS to change the color, width, height, and other basic user interface (UI) display elements.
If you haven’t done that already, please download a copy of nopCommerce source code package from its CodePlex project page (this posts is explained using nopCommerce 2.80, but the general principles should apply to other nopCommerce 2.XX versions). Extract the files to a desired folder and open NopCommerce.sln in Visual Studio. In the Solution Explorer in Visual Studio, you can see that a complete, beautiful default theme – Default Clean – has already been created for you (the original theme prior to nopCommerce 2.80 is Dark Orange).
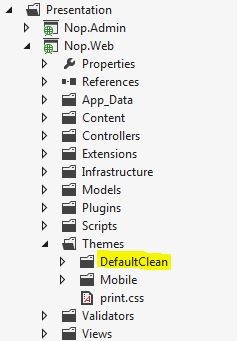
As we can see from the image, a theme named DefaultClean is included under the Themes folder. Now, Rebuild the whole solution, Start the website (CTRL + F5) in Visual Studio and you’ll see a beautiful default theme of nopCommerce. Your entire e-commerce website is built in less than 10 minutes. Pretty cool huh!
However, most websites need their very own designs and functionalities. You might want to have different colour, different content placement or totally different website structure. This is the time where the default theme is not 100% suitable for you anymore and you have to create your own theme, or at the very least you would like to customize DefaultClean to suit your needs.
The easiest way to start customizing DefaultClean is to open up the CSS and change the styles right away. For example, by simply changing the styles.css in ~/Themes/DefaultClean/Content folder, I can quickly change the color to look like below:
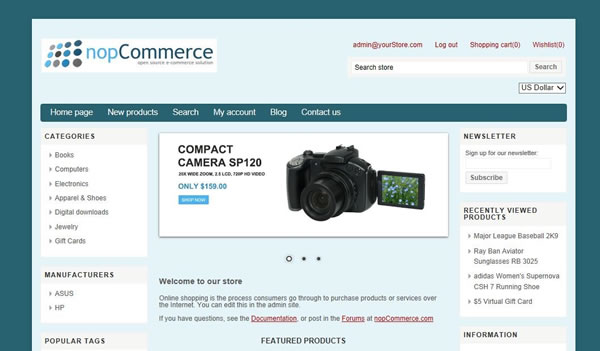
But this doesn’t always work because in many cases we want to have a radically different layout than DefaultClean, and changing only the CSS is no longer enough. Fortunately, nopCommerce allows us to install multiple themes and we can basically achieve any crazy things we want by customizing the theme!
nopCommerce version 2.X has a very flexible theming architecture. As nopCommerce version 2.x is running on ASP.Net MVC, it is good that you have basic experience working with ASP.Net MVC. I’ll try to make the content as easy to understand as possible, but basic MVC experience is still recommended. It is also desirable that you have a copy of nopCommerce running on your local machine such that you can follow along with the blog posts.
nopCommerce Theme Architecture Explained
There are basically 2 places you can work on to alter the look of nopCommerce: the ~/Views folder and the ~/Themes folder. If you take a look at the ~/Views folder, you’ll see that it’s further organized into different folders. For example, you have the following structure in nopCommerce 2.80.
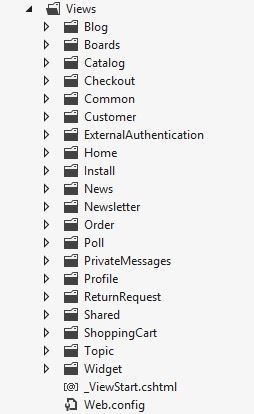
With the exception of Shared folder, each folder name (Blog, Boards, Catalog and etc) corresponds to a Controller name. Each of the folder in turn contains several Views. Views are like HTML, but they can contain C# code to facilitate dynamic behaviors. Now open Index.cshtml in Home folder, and you’ll see something like below:
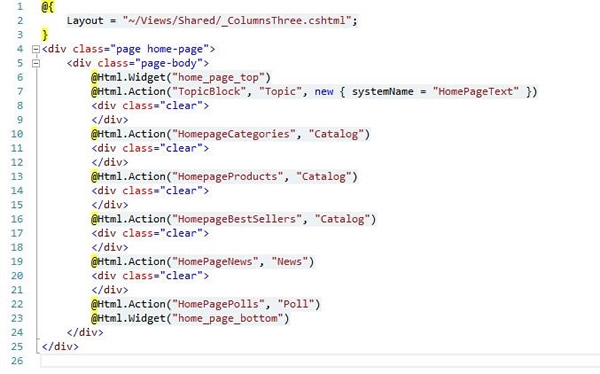
As shown in the above figure, a View is the actual component that is used to render the UI. It usually contains HTML code with some C# and Razor code in between. Razor is a templating language (or View Engine as it is officially called) used by ASP.Net MVC. You have to be pretty familiar with Razor because it is used heavily in nopCommerce themes.
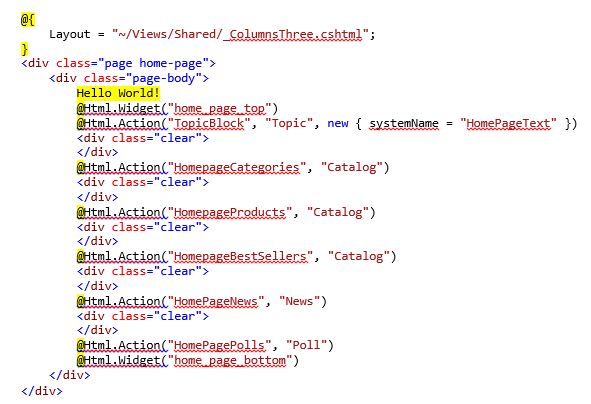
Now, just to show a little example, try edit the code in Home > Index.cshtml to look like this:
Run the application, you’ll see the phrase "Hellow World" appear at the home page. You see that with a simple change of the Index.cshtml View, we can easily add/change the UI to our needs. But what we’ve just done isn’t actually a good practice. We’ve directly modified the original files under ~/Views folder, which is not a good practice at all.
A better way is to use a Theme to overwrite the Views. nopCommerce 2.XX theme engine uses what I call the ‘fallback’ approach: nopCommerce will look for the specific View in your Theme. If it can't find the View then it falls back to the original View at ~/Views. Otherwise your theme's Views override the original Views. For example, we can overwrite ~/Views/Home/Index.cshtml by having a file of the same name with modified content at ~/Themes/THEME_NAME/Views/Home/Index.cshtml.
As the best practice, you should create a new theme and keep all original Views intact, so that when you do an upgrade next time, you just have to move your Theme folder over to the newer version of nopCommerce and modify accordingly. Clean and easy. Now, let’s move on to see how to create your own theme.
Creating and Customizing Your Theme
In this tutorial, we would not discuss about HTML and CSS, but just the tips and tricks to create a new nopCommerce theme. First of all, make a copy of DefaultClean and change the folder name and the content in theme.config accordingly. Next step, open Head.cshtml, change the CSS paths to point to your own Theme.
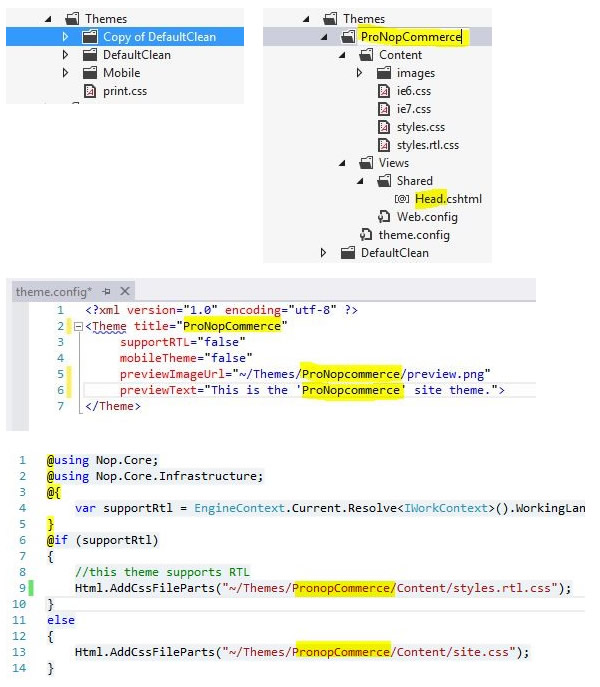
Then, the newly created theme will appear on nopCommerce Dashboard which can then be activated.
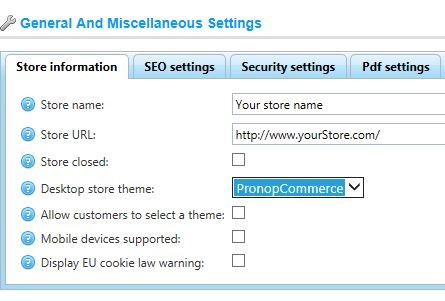
Finally, you are able to edit your style sheet now! Change whatever colors, fonts, backgrounds, images as you like. As shown previously, I have changed the default color scheme to be blue.

Customizing Your Theme – Changing the General Layout
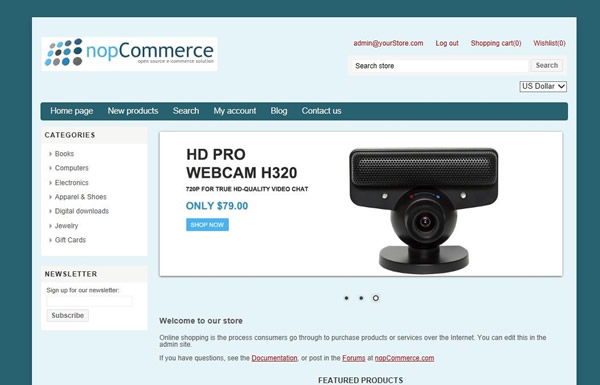
Now you may wonder: what if I want to change the layout of the website? In this case, you will need to edit the Views. Let say I want to modify my homepage; and in the new design, I want my homepage to have two columns instead of a three-column layout and I do not want the Manufacturers Navigation Block appearing in my whole website. In order to achieve that, first I have to edit Home/Index.cshtml.
As you can see from the theme you’ve just created, each theme has its own Views folder and it is the location where you should keep your customized View templates. Let’s make a subfolder called Home under your theme’s Views folder, and copy and paste Index.cshtml from ~/Views/Home into ~/Themes/THEME_NAME/Views/Home. Remember I've previously explained that, if your theme has any View that matches the folder and file name of that in the ~/Views folder, the View in your Theme will take precedence. So ~/Views/CONTROLLER_NAME/VIEW_NAME.cshtml will be overwritten by ~/Themes/THEME_NAME/Views/CONTROLLER_NAME/VIEW_NAME.cshtml.
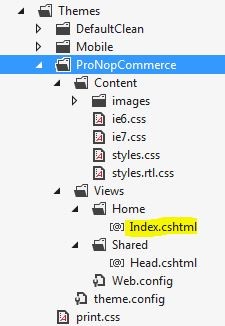
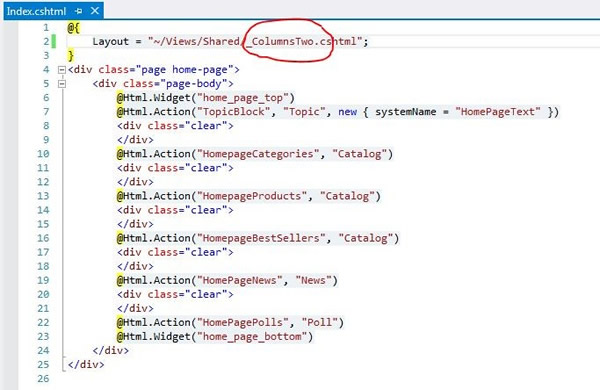
Now, modify the layout from “_ColumnsThree.cshtml” to “_ColumnsTwo.cshtml” as shown below:
And your homepage should appear like below:
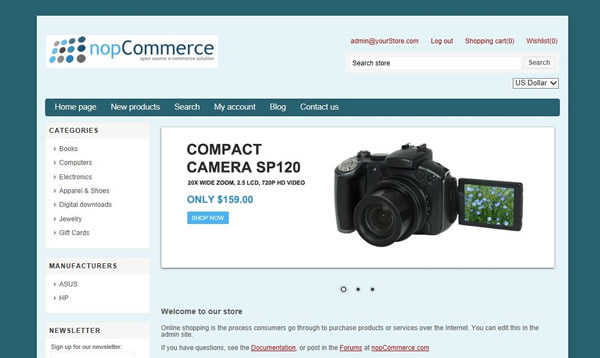
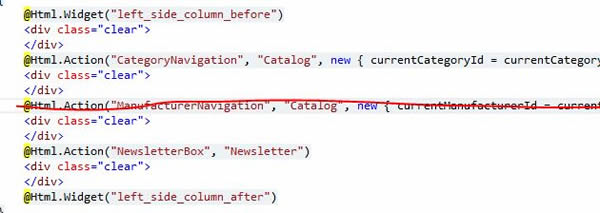
Next, we need to delete the Manufacturers Navigation Block. To remove the Manufacturers Navigation Block, we have to edit _ColumnsTwo.cshtml found under Shared folder. Again, make a copy of _ColumnsTwo.cshtml from the original ~/Views folder and locate it under the Shared folder of your theme’s Views folder. Delete the ManufacturerNavigation in your _ColumnsTwo.cshtml:
Your current website should now look like this:
Additional Tips
Do you need to move all view templates over your theme folder? Luckily you do not have to do so! Only those that you want to make changes on are required. I’ve explained the concept previously, but I’ll do that again in case you still can’t get it. nopCommerce’s theme structure works in a mechanism like the following:
When an Action Method is ready to be rendered, the theme engine first matches the required View in the folder of the currently activated Theme. If a match is found, the View in the Theme will take precedence and will be used to render the UI. Otherwise, it will search again in the original ~/Views folder in search of the same View (I call this a fallback approach). In other words, your modified Views will always be given a higher priority than the original Views.
Conclusion
Finally, this post has come to its end. What I've explained is the basic concepts of nopCommerce theme, but understanding these concepts is enough for you to do crazy things on nopCommerce! I hope that you will find this brief tutorial useful on your own projects. If you have any question, please feel free to post them in the comments and I’ll answer them! Also, if you need any nopCommerce theme creation service for your own nopCommerce store, please feel free to contact me and discuss!


 I am Woon Cherk, an