One of the biggest advantages of running nopCommerce on Linux is the low cost. It is a known fact that Linux hosting is way cheaper than Windows hosting. A shared Windows hosting plan with only 512MB of memory will cost around $7-$8 a month. Whereas for $10 a month you can get a Linux VPS hosting plan with 2GB of memory and SSD storage. The SSD storage has the added benefit of increased download speed compared to HDD hosting. This is why running nopCommerce on Linux is such an attractive option.
If you are interested in running nopCommerce on Linux, this tutorial will take you through the installation steps while explaining in detail the purpose and concepts behind each of the steps. By the end of this tutorial, you will have a good understanding of how nopCommerce is installed on Linux.
Preparation
To begin this tutorial you will need the following:
Linux VPS Hosting
You will need to have access to a Linux hosting account. Here are three recommended hosting providers. I have first hand experience with all of these 3 hosts, and I highly recommend them. As a guideline, if you are hosting a medium traffic site with around 5000 monthly visitors, I would suggest starting with 1 vCPU with 2GB RAM. It’s easy to monitor the resource usage with some Linux commands, so you can start with the basic setup, and add more CPU / RAM as you see fit. Go ahead and sign up for one. Note that all of the links are affiliate links.RackNerd: https://my.racknerd.com/aff.php?aff=3844 . At the time of writing, they have this awesome deals where you get 2 vCPU and 2GB RAM at only $24.98 per year (yes, just around $2 a month).
InterServer: https://www.interserver.net/vps?id=640958 . Make sure you use the coupon code VPSPENNY at the checkout to receive 50% off the first month.
Vultr: https://www.vultr.com/?ref=9031284-8H . Receive $100 in free credit for trying out their platforms.
An SSH Client
To connect to SSH, my favourite tool is MobaXterm. I will be using it throughout this tutorial. But you can use whichever SSH client you are most comfortable with.
You can download and install MobaXterm here.Read nopCommerce's documentation
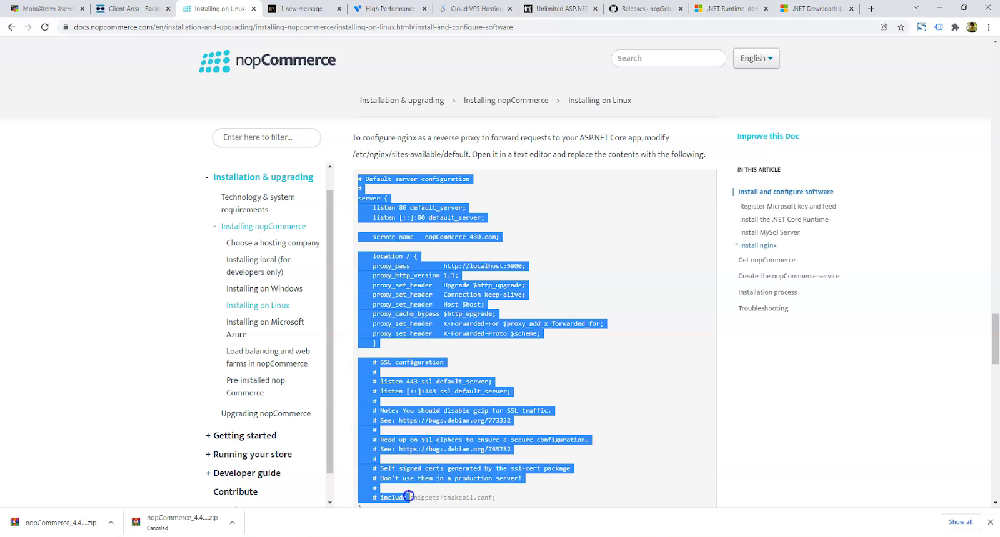
This tutorial will explain nopCommerce’s official documentation on Installing on Linux in detail. Please read the original documentation. You do not need to do anything yet as I will walk you through those steps with detailed explanations in this tutorial.
Setting Up the Environment
After signing up for a Linux hosting plan you will receive your SSH login credentials. Let's use that to log in to SSH using our SSH client.
In MobaXterm, click on the "Sessions" button to start a new session. In the Session settings window that appears, select SSH. More fields will appear. Enter the IP address of your host, check "Specify username" and enter your username. You can find your username in the SSH login credentials you received from your Linux hosting provider.
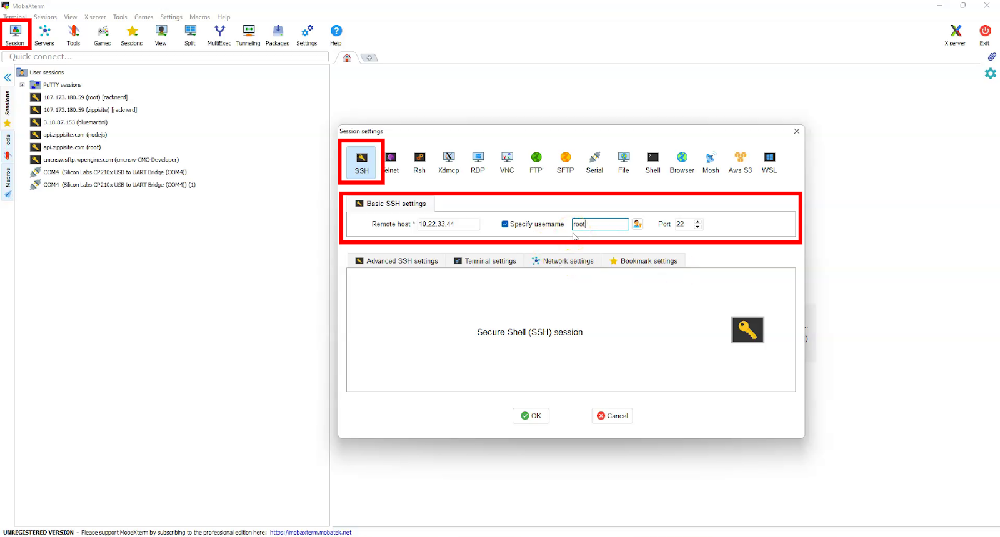
And click "OK". The terminal will now prompt you for your password.
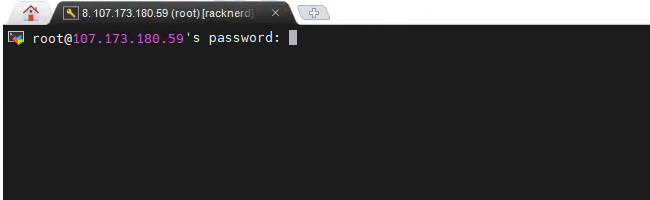
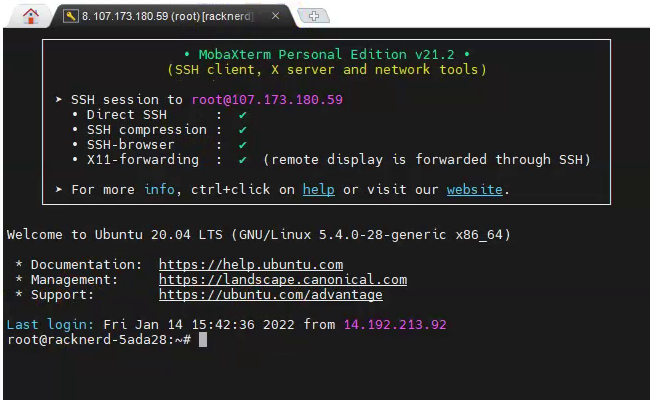
To paste your password, just right-click in the terminal. If you are new to MobaXterm, a pop-up will appear after right-clicking the terminal. In the pop-up, you can set right-click to either open the context menu or paste. I have mine set to paste. Note that no characters appear when pasting or typing in the password. Just press the "Enter" key to log in. Once you have logged in successfully you will be shown this screen where you can start entering commands.
So the first thing you want to do is to register the Microsoft key and feed. Referencing nopCommerce's documentation, we have to run these two commands.
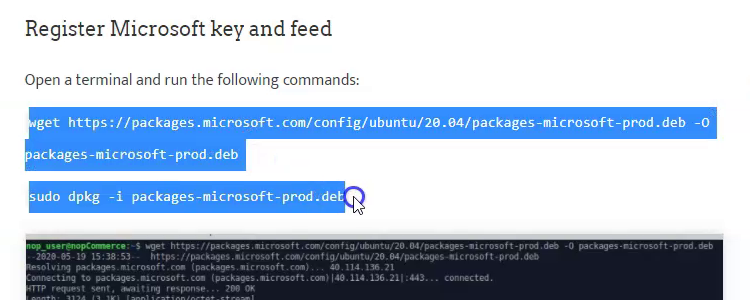
Copy the commands from here.
There is no configuration required here so go ahead and follow the instructions.
Next is to install the .NET Core runtime. Be aware that you should install the version of .NET Core that is compatible with the version of nopCommerce you intend to use. We can check nopCommerce's release notes for which version of .NET Core is required.
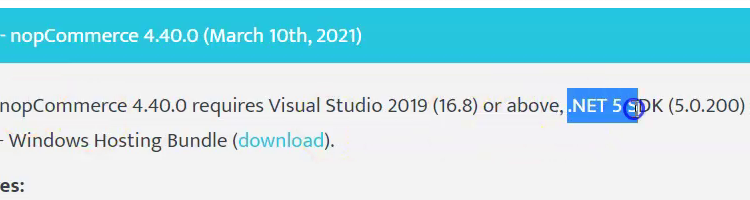
Check nopCommerce’s release notes.
As you can see, for nopCommerce 4.40 we will need .NET Core 5. Note the sub-version usually doesn't matter. Whether it is 5.0.200 or 5.0.400, it shouldn't matter as long as the major version is correct.
Let's copy the command from the nopCommerce documentation. And right-click in MobaXterm's terminal to paste. You may have noticed that the command we pasted is going to install .NET Core 3.1. We can change that to .NET Core 5.0 by replacing "3.1" with "5.0". And run the command.
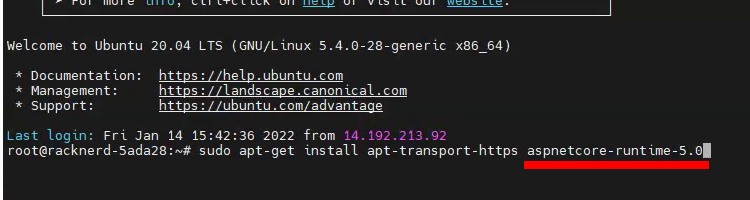
Again it doesn't matter what the newest sub-version is. Because when you specify .NET Core Runtime 5.0, it will install the latest version of .NET Core 5. Which at the time of writing is 5.0.13. And that's .NET Core runtime installed.
Next up is the MySQL server. Go ahead and run the command to install MySQL in the documentation.
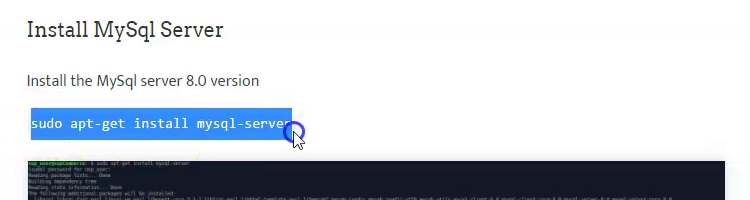
Copy the command from here.
After the installation is successful, proceed to set up MySQL by running the following command:
sudo /usr/bin/mysql_secure_installation
The installation wizard is quick and easy to follow. For more info, you can refer to DigitalOcean’s article for a detailed step-by-step explanation of how to set up MySQL.
Make sure to remember the root user’s password, which you will need later when running nopCommerce’s installation wizard.
Nginx is next. Installation is straightforward, just run the command in the documentation.
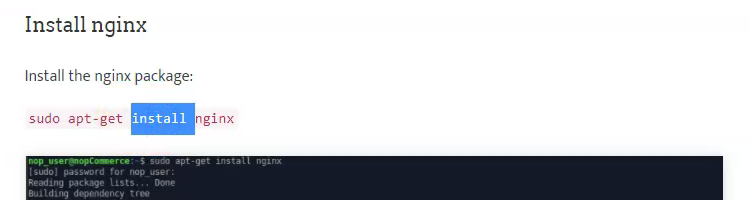
Copy the command from here.
Now you pretty much have all you need to run a web application. For those who are familiar with Windows hosting, nginx functions as the web server and is equivalent to Windows' IIS. For the database, we have MySQL to Windows' Microsoft SQL.
Nginx => server = IIS on Windows
MySQL => database = MS SQL on Windows
With those two installed we are now ready to install nopCommerce.
Start by deciding where you want to host your file. In my case, this is an Ubuntu system. So the default directory is usually "/var/www" followed by the domain name. In the terminal, let's move into that directory. One neat feature in MobaXterm is the "Follow terminal folder" feature. When enabled, it will update the SFTP tab to display the directory the terminal is currently in.
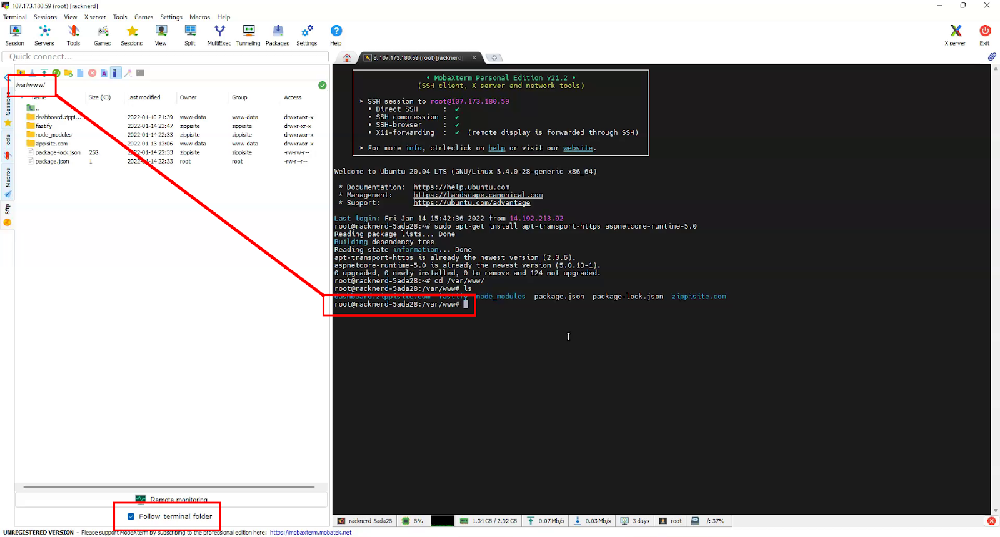
For example, I am now in the folder “/var/www”. To move into the folder “dashboard.zippisite.com”, I will run the following command:
cd dashboard.zippisite.com
After running the command, you can see that the SFTP tab has followed the terminal and moved to the same directory.
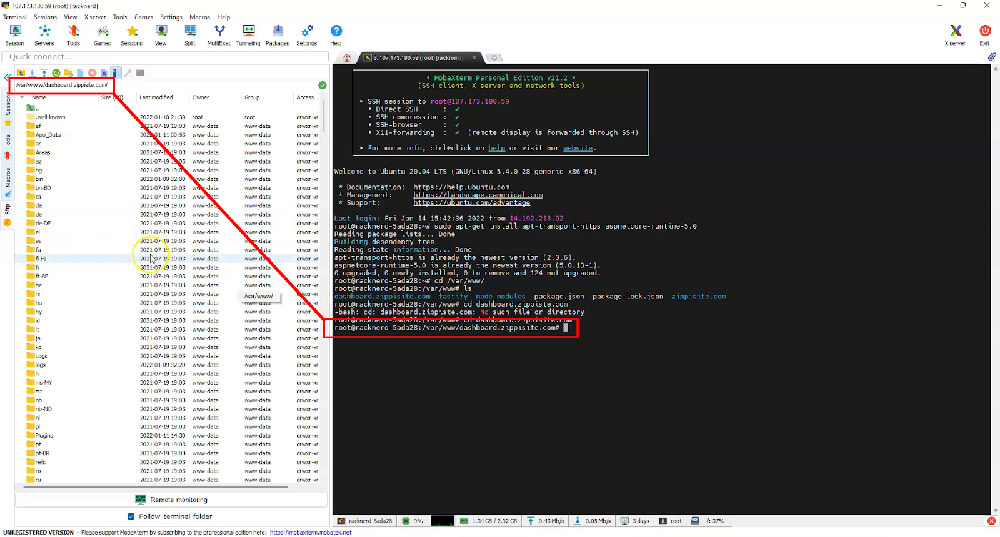
Anyway, let's go back to "/var/www" by using the following command to go up one folder level:
cd ..
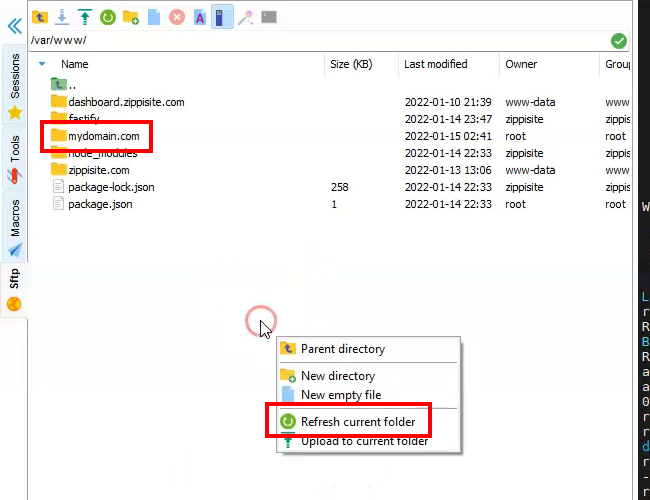
Let's say our nopCommerce website is called "mydomain.com". In the default directory, we will create a directory called "mydomain.com". To do that I'll run the command:
mkdir mydomain.com
Now, let's refresh the SFTP tab by right-clicking in the tab and selecting "Refresh current folder". We can see a new folder called “mydomain.com” has appeared.
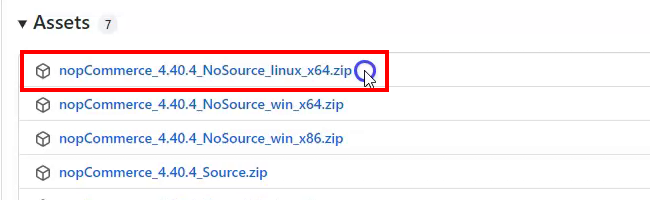
The next step is to download nopCommerce 4.40 here. Make sure to download the Linux version without source code. The Windows version won't work in Linux.
Note: In the original article, we are instructed to run a bunch of commands to download the source code from nopCommerce’s official github.com repository. In this tutorial, I will show you how to do it manually. This is to give you the option of uploading your own customised source code in the future.
Once you have downloaded it, you can easily upload using the SFTP client in MobaXterm. In the SFTP tab, double-click on the “mydomain.com” folder. Make sure the path is your website folder: "/var/www/mydomain.com/". Then simply drag and drop the zip file into the SFTP tab and it will immediately begin to upload.
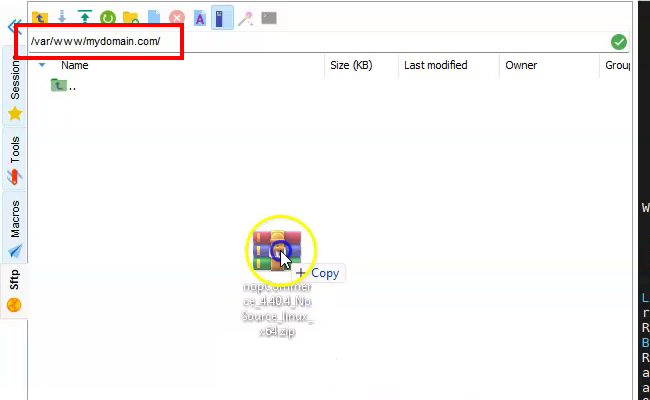
You may have noticed when we moved to another directory using the SFTP tab that nothing happened in the terminal. The terminal is still in the previous directory and does not follow the SFTP folder. This means we have to move the terminal to the correct directory where the zip file is before running the unzip command. In other words, the SFTP panel on the left and the terminal panel on the right are independent. So please always check if you are in the correct directory before doing anything.
As a side note, if you have a fresh installation of Ubuntu it is likely that it didn't come with any unzip feature. You can install it by running this command:
sudo apt-get install unzip
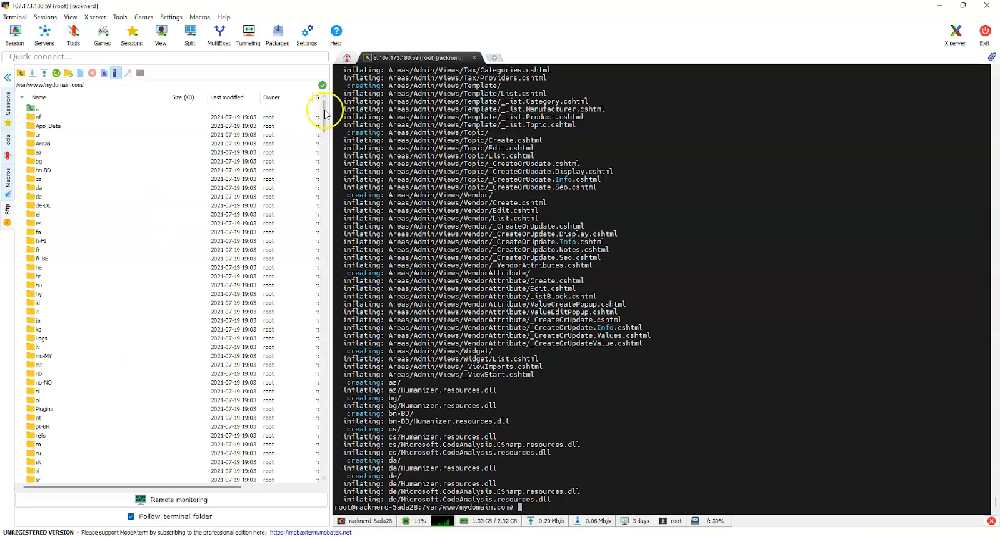
To unzip, just type "unzip" followed by the file name.
unzip nopCommerce_4.40.4_NoSource_linux_x64.zip
When that's done, refresh the SFTP tab and you will see all the unzipped files appear.
The next step is to create two new directories, "bin" and "log" in the same directory our extracted files are in. Run these commands to create the directories:
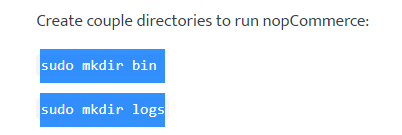
Copy the commands from here.
Now we will set folder permissions to allow nginx to modify the contents of the directories. A quick reminder, we are now in "/var/www/mydomain.com" which contains our extracted files along with the newly created directories, "bin" and "log". In order to change folder permissions for "/var/www/mydomain.com", we have to go up a level with the following command:
cd ..
Now, we are in "/var/www/".
Copy these commands from the nopCommerce article.

Copy the commands from here.
Paste and replace the target folder "nopCommerce440/" with the name of our folder "mydomain.com/".

Run the commands. This gives the user called "www-data" write permission for the contents in the "mydomain.com/" directory. Since nginx identifies itself as a user by the name of "www-data", nginx now has the permission to modify the contents in that directory.
Configuring Nginx to Run nopCommerce
Now that the nopCommerce files have been uploaded, we will configure nginx to point to it. Nginx listens for any incoming requests on port 80 for HTTP and port 443 for HTTPS. And compares the request with the sites hosted in the "/var/www" folder. In my case, I have a total of four websites hosted in that folder. Nginx will determine which of the four domains the request is for and route it there. So if a request comes in for “mydomain.com”, we want nginx to route that request to the web app at "/var/www/mydomain.com/Nop.Web.dll".
To tell nginx how we want to route requests for mydomain.com, we have to create a configuration file. In the terminal, let's change directory to "/etc/nginx".
cd /etc/nginx
Run the list command.
ls
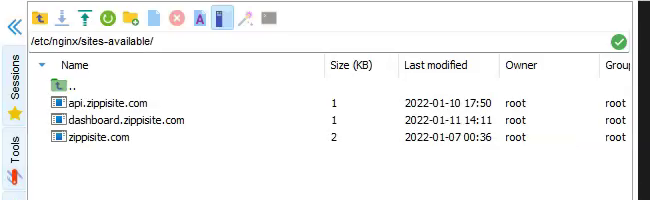
You will see a folder here called "sites-available". Let's change directory into "sites-available". This is where we want to place our configuration file.
cd sites-available
In the SFTP tab, you can see that I already have three configuration files for my other three apps.
Now I am going to add a configuration file for the new mydomain.com app. So let's run this command:
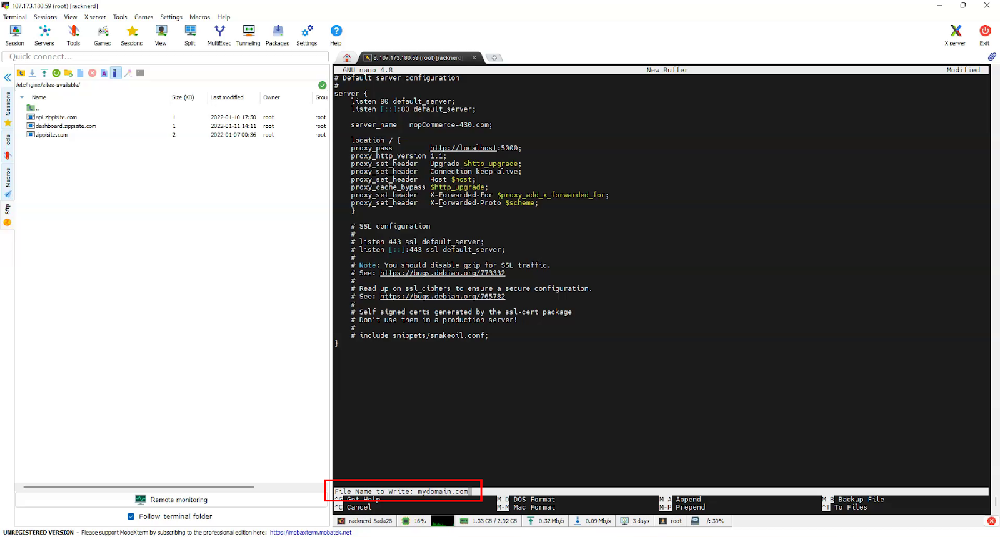
nano mydomain.com
Nano is a text editor that comes with Ubuntu. This command tells Nano to open a new text file called "mydomain.com". You can pick any file name you want but for convenience, I usually name it after the domain. With Nano opened in the terminal, let's copy the configuration from the nopCommerce documentation.
Remember it is right-click to paste in the terminal and not Ctrl-V. Next press Ctrl-S and enter the file name “mydomain.com” to save.
If we refresh the SFTP tab we can see our new configuration file "mydomain.com" has been created.
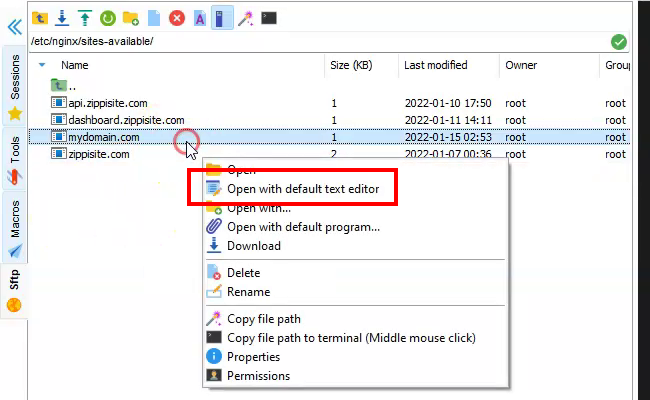
If you are not comfortable using a command-line style editor like Nano, in the SFTP tab you can right-click the file you want to edit and open it with your default text editor.
Now we have to customise the configuration file to our needs. I'm reopening this file in my default text editor. I'll remove the comments at the end which are the lines that begin with a hash (#). The removed lines are related to HTTPS / SSL. We’ll talk more about this next tutorial. For now, let’s get the HTTP version working first.
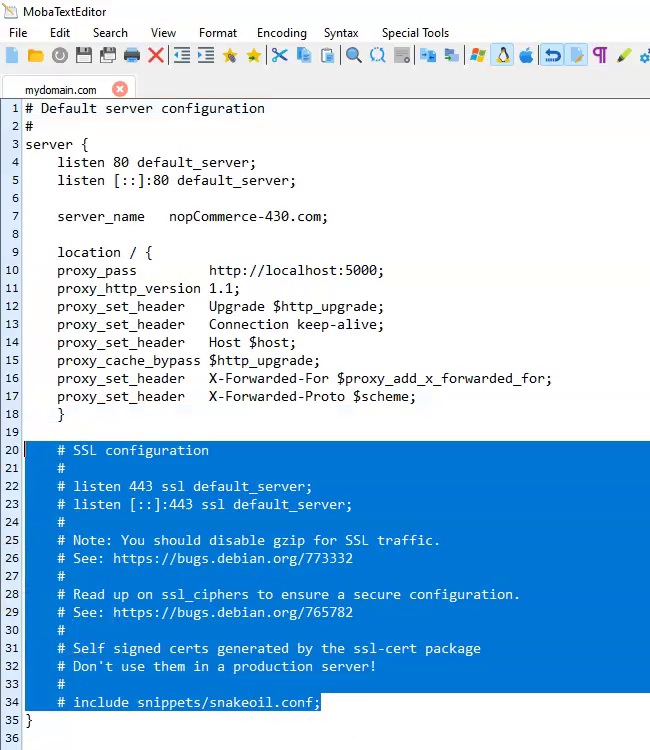
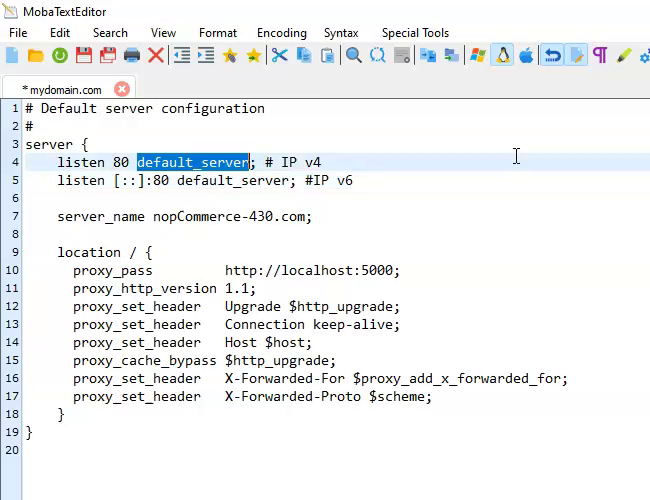
The configuration starts with:
  listen 80 default_server;
  listen [::]:80 default_server;
This means that nginx will listen on port 80 for both IPv4 and IPv6. The "default_server" means that if there's any unmapped domain that is pointing to this IP, this configuration will be used as the default. And you can specify only one configuration file to be the default. Depending on your needs you may want to keep it or remove it. In my case, I don't want this to be the default configuration so I will remove it.
Moving on, the server name should be changed to the domain that requests are to be routed to. So I will replace it with "mydomain.com" and "www.mydomain.com".
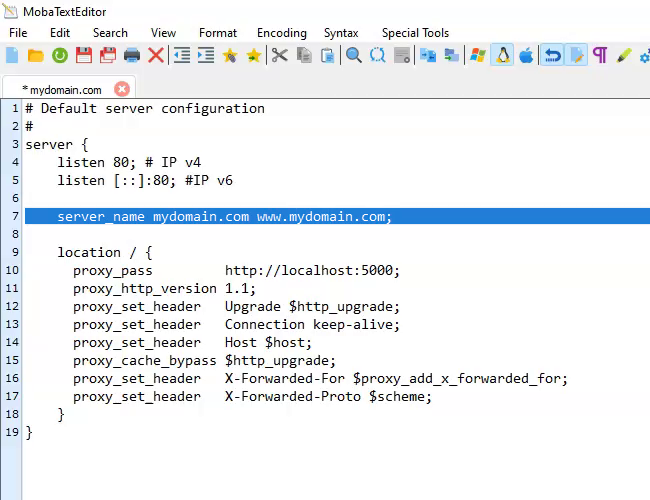
In "location", we can see the "proxy_pass" directive is set to "http://localhost:5000". It means nginx will route the request to port 5000. This is because our app (Nop.Web.dll) is listening on port 5000.
Note: We’ll talk more about port 5000 in the next tutorial when we learn how to set up multiple nopCommerce instances on the same server. But for now, let’s just keep it at the default port, which is port 5000.
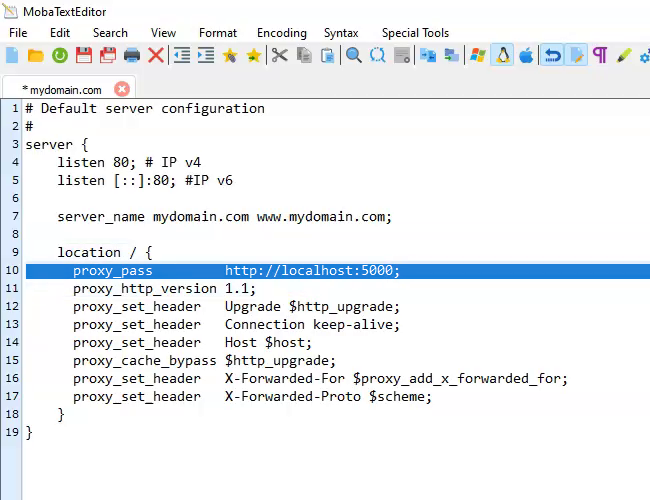
So this configuration file tells nginx that when a request comes in on port 80 for mydomain.com, it should route the request to localhost port 5000. Which is the port where Nop.Web.dll is listening to.
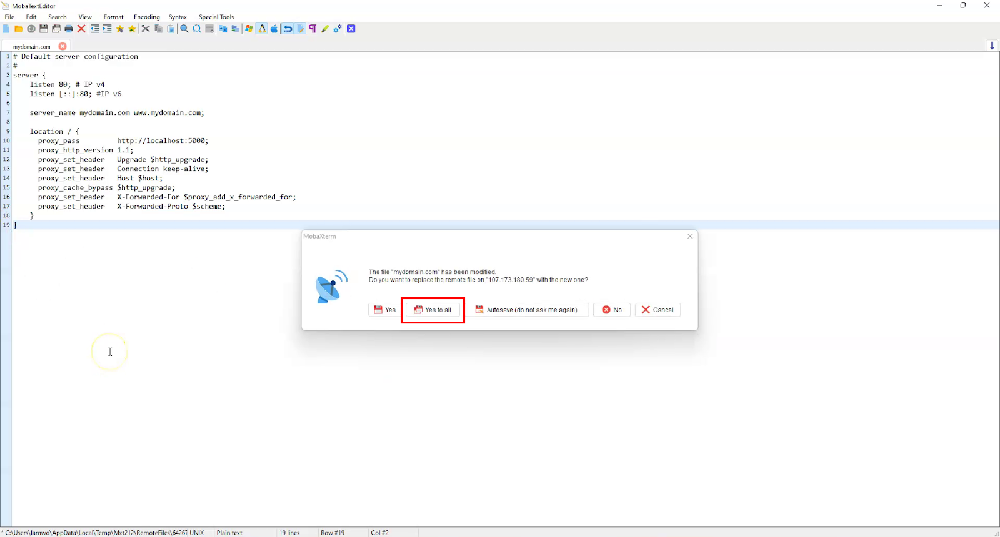
Now the configuration is done. Save the file. A pop-up will appear from MobaXterm asking if you would like to replace the file in the server. Click "Yes to all".
After saving the configuration file, we have to create a symbolic link that connects the file in "/etc/nginx/sites-available" to the folder "/etc/nginx/sites-enabled". For details on why this is necessary, you can read more about it here: https://serverfault.com/a/527644
Type in the command below into the terminal. Remember to change the configuration filename "mydomain.com" to the filename you chose.
sudo ln -s /etc/nginx/sites-available/mydomain.com /etc/nginx/sites-enabled/
Now that we have prepared the nopCommerce files, Nginx and MySQL, we can proceed to create the nopCommerce service that nginx can route requests to. To do so, we will create a configuration file to instruct .NET to run Nop.Web.dll and start Nop.Web.dll as a service. Let's go to the directory where we will create the configuration file.
cd /etc/systemd/system/
Then we will run a command to create a new file.
nano mydomain.com.service
I usually name the new file according to the domain it is for. It really doesn't matter what name you give the file as it is usually identified by its contents and the directory it is in. I conveniently name it after the domain it is for so that it is easy for me to identify at a glance.
After running the command, copy the following contents from the nopCommerce documentation.
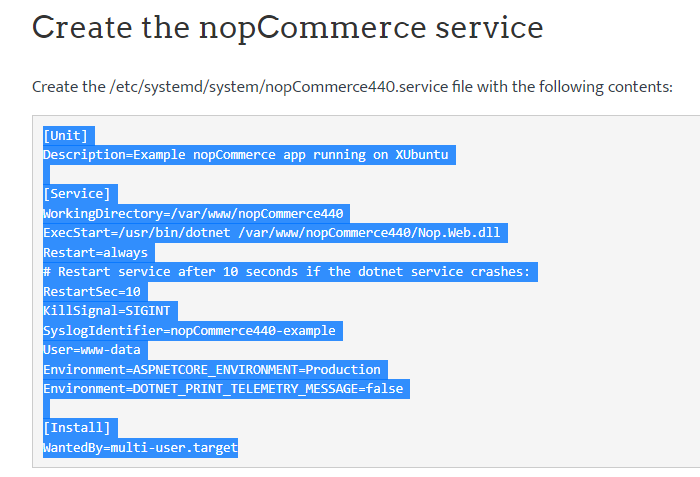
Copy the contents from here.
And paste it into Nano text editor.
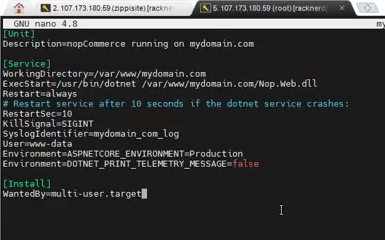
There are a few things we need to change to suit our needs. Starting with the description. The description is only for our own reference. So, I will change it to:
Description=nopCommerce running on mydomain.com
Following that is the Working Directory. This is important and should point to the directory that contains the extracted nopCommerce files.
WorkingDirectory=/var/www/mydomain.com
Also, change the "Nop.Web.dll" path in ExecStart to the right path.
ExecStart=/usr/bin/dotnet /var/www/mydomain.com/Nop.Web.dll
It is up to you if you want to change the SyslogIdentifier. It is a good idea to give it a label that allows you to easily identify this service in the system log. I'll call it "mydomain_com_log".
SyslogIdentifier=mydomain_com_log
Here is a screenshot of the contents with the changes we have made.
I'll press Ctrl-S to save the file. And then press Ctrl-X to exit Nano text editor. To check, I'll run the list command. You can see that the file "mydomain.com.service" now appears in the directory.

After creating this service, we have to start it by running this command:
sudo systemctl start mydomain.com.service
The command will start nopCommerce as a service on Linux. Next, we can check the status by running this command:
sudo systemctl status mydomain.com.service
This is the result of the status check:
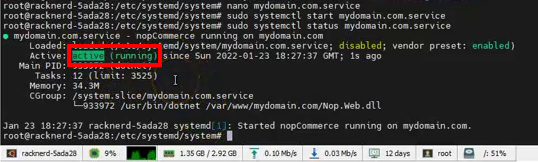
You can see that it is active and running.
After setting up all these, we need to restart nginx. Run the following command:
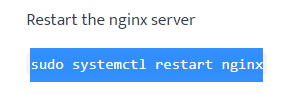
This is to make sure nginx picks up and applies the configurations we have created earlier. Specifically, the configurations that instruct nginx to route web requests to the port that Nop.Web.dll is listening on.
One last step before you can install and configure the nopCommerce store is to point your domain to the correct IP. For my case, the IP for my VPS is 107.173.180.59, so I will point my domain to that IP.
Finally, we can enter "mydomain.com" in a browser and start the installation for our nopCommerce store.

Troubleshooting
If nopCommerce fails to start or "systemctl status mydomain.com.service" returns the following results:

You can use this very powerful command to find out why nopCommerce is not running correctly.
sudo journalctl --since “1 minute ago” | grep “mydomain”
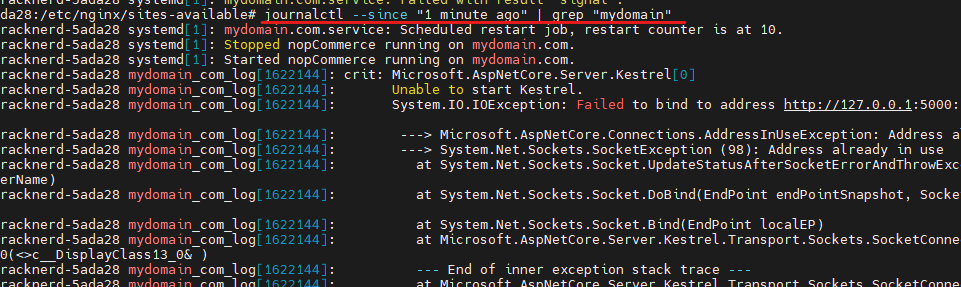
The main command is "journalctl". The parameter '--since "1 minute ago"' tells journalctl to load log entries made in the past 1 minute only. You can set it to limit to "X minutes ago", "X hours ago", etc.
Then the '| grep "mydomain"' command will limit the results to only log entries that contain the keyword "mydomain". This is a very helpful command especially if you host multiple domains. It gives you the ability to search only log entries that are related to a specific domain.
Conclusion
Once you are familiar with the process of setting up nopCommerce on Linux it becomes a simple task of running a few commands. Plus, you only need to set up .NET Core, MySQL and nginx once.
I hope you have learnt something from this article. Please feel free to ask questions in the comment section. I'm not a Linux expert but I'll try my best to help!
In the next tutorial, we will go over how to (1) set up free SSL, (2) set up multiple instances to run together, and (3) compile your own customised nopCommerce code to run on Linux.